
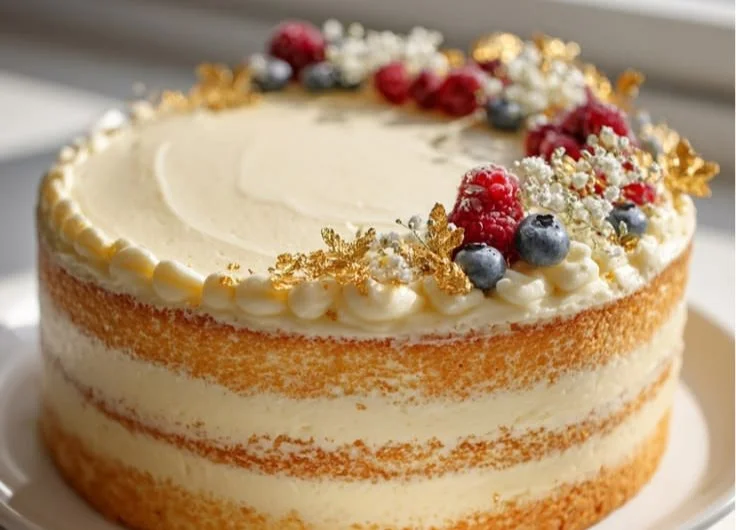
There’s something undeniably magical about a birthday cake. The way its presence lights up a room, the promises of sweet indulgence, and the sheer joy it brings as loved ones gather ‘round to celebrate another year of life. And in my own life, there’s one cake that has held the spotlight during many birthday celebrations—my Vanilla Bean Birthday Cake with Buttercream Frosting.
This cake is not just a treat; it’s a labor of love that combines fragrant vanilla bean pods with a fluffy, moist cake and a rich, creamy frosting. I remember the first time I made it for my sister’s birthday. As soon as the cake hit the table, the room filled with the irresistible aroma of vanilla. Everyone, from my tiny nephew to my grandmother, indulged with moans of delight. Each slice reveals tender layers filled with sweet frosting, and it couldn’t have been a better centerpiece for our celebration. So, whether it’s your birthday or someone else’s, this cake will surely become a beloved tradition in your home, just like it is in mine.
Recipe Timing
- Prep Duration: 30 minutes
- Active Cooking: 30 minutes
- Total Duration: 1 hour
- Portion Size: Serves 12
- Complexity: Moderate
Nutritional Recipe
- Calories per portion: 480
- Protein: 4g
- Carbs: 67g
- Fats: 23g
- Fiber: 0g
- Sugars: 40g
- Sodium: 150mg
Why You’ll Love This Vanilla Bean Birthday Cake with Buttercream Frosting
What sets this birthday cake apart is its depth of flavor. The real vanilla bean elevates the cake from ordinary to extraordinary, infusing it with intense, warm notes that a mere extract can’t replicate. The buttercream frosting is luxuriously smooth, creating a perfect complement to the rich cake beneath. It’s simply a joy to share—making the act of celebrating birthdays even sweeter.
The Complete Cooking Journey
Let’s take a deeper dive into the steps that will lead us to this impressive creation. Each step is not just about following a recipe but discovering the joy of baking. As you whip, mix, and frost, you’ll be filled with excitement, anticipation, and a sense of accomplishment.
Ingredients:
- 2 1/2 cups all-purpose flour
- 2 1/2 tsp baking powder
- 1/2 tsp salt
- 1 cup unsalted butter, softened
- 2 cups granulated sugar
- 4 large eggs
- 1 tsp vanilla extract
- 1 vanilla bean, seeds scraped
- 1 cup milk
- 4 cups powdered sugar
- 1/2 cup unsalted butter, softened (for frosting)
- 2-3 tbsp heavy cream (for frosting)
- Additional vanilla beans for decoration (optional)
Method:
Step 1: Preheat the Oven
Preheat your oven to 350°F (175°C). Grease and flour three 9-inch round cake pans, setting yourself up for success.
Step 2: Whisk Dry Ingredients
In a bowl, whisk together the flour, baking powder, and salt. This simple step ensures everything is evenly distributed for a perfect rise.
Step 3: Cream Butter and Sugar
In a large mixing bowl, cream together the softened butter and sugar until light and fluffy. You’ll know it’s ready when the mixture is pale and airy. Add the eggs one at a time, mixing well after each addition. Stir in the vanilla extract and the scraped seeds from the vanilla bean, letting that tantalizing flavor shine through.
Step 4: Combine Wet and Dry Ingredients
Gradually add the dry ingredients to the wet mixture, alternating with the milk. Start and end with the dry mixture, mixing until just combined. Overmixing can result in a dense cake, so be cautious.
Step 5: Bake Your Cakes
Divide the batter evenly among the prepared cake pans and smooth the tops. Bake for 25-30 minutes, or until a toothpick inserted in the center comes out clean.
Step 6: Cool Cakes
Let the cakes cool in the pans for 10 minutes before transferring them to wire racks to cool completely. Patience is key here!
Step 7: Make the Buttercream Frosting
For the buttercream frosting, beat the softened butter in a bowl until creamy. Gradually add in the powdered sugar, mixing until smooth. Add heavy cream as needed to get the desired consistency—your ideal frosting should be spreadable but thick enough to hold its shape.
Step 8: Assemble Your Cake
Once the cakes are completely cool, layer them with frosting in between and cover the entire cake with the remaining frosting. Don’t worry about making it perfect; the charm of homemade cakes often lies in their unique character!
Step 9: Garnish for Celebration
Decorate with additional vanilla bean seeds if desired, and serve to celebrate! Slicing into this beautiful cake will reveal its delightful layers and surely make smiles all around.
Serving Suggestions & Pairings
Pair this cake with a cup of freshly brewed coffee for an adults-only gathering, or serve it alongside a scoop of vanilla ice cream for kids (and the young at heart) to take it over the top. You could even consider a drizzle of chocolate ganache for that extra dessert flair!
Storage & Leftovers Guide
If you happen to have any leftovers (which is unlikely!), you can store the cake in an airtight container at room temperature for 3-4 days. For longer storage, wrap slices separately and freeze for up to 3 months. Just remember to let it thaw at room temperature before enjoying it again!
Kitchen Wisdom & Success Tips
- Make sure your butter is at room temperature for better creaming.
- Don’t skip the step of letting your cakes cool completely—this will prevent your frosting from melting off.
- Use a serrated knife to level the tops of your cakes for a professional finish.
Flavor Variations & Adaptations
Feel free to experiment with this cake! Adding a splash of almond extract can give it a different profile, or you can fold in some lemon zest for a fresh twist. For chocolate lovers, substitute some cocoa powder for an unforgettable chocolate-vanilla fusion!
Reader Questions & Solutions
- Why is my cake dense? Ensure you aren’t overmixing after adding the flour, as this can develop gluten and create a dense texture.
- Can I make this cake ahead of time? Absolutely! Bake the layers a day in advance, wrap them tightly in plastic wrap, and refrigerate until ready to frost.
- What can I use if I don’t have vanilla beans? You can substitute with 1-2 tablespoons of good-quality vanilla extract, understanding it won’t have the same depth of flavor.
- How do I ensure my cake doesn’t stick to the pan? Properly greasing and flouring the pans is essential. You can also line the bottom with parchment paper for extra insurance.
- What should I do if my frosting is too thick? Just add a little more heavy cream, one tablespoon at a time, until you reach your desired consistency.
Wrapping Up
This Vanilla Bean Birthday Cake with Buttercream Frosting isn’t just a recipe; it’s a delightful experience waiting to happen. With its velvety texture and aromatic flavor, it will surely become a cherished favorite in your household, sparking joy during celebrations big and small. So roll up your sleeves, gather your ingredients, and let the oven do its magic! Happy baking!
PrintVanilla Bean Birthday Cake with Buttercream Frosting
A fluffy, moist vanilla bean birthday cake layered with rich buttercream frosting, perfect for celebrations.
- Prep Time: 30 minutes
- Cook Time: 30 minutes
- Total Time: 60 minutes
- Yield: 12 servings 1x
- Category: Dessert
- Method: Baking
- Cuisine: American
- Diet: Vegetarian
Ingredients
- 2 1/2 cups all-purpose flour
- 2 1/2 tsp baking powder
- 1/2 tsp salt
- 1 cup unsalted butter, softened
- 2 cups granulated sugar
- 4 large eggs
- 1 tsp vanilla extract
- 1 vanilla bean, seeds scraped
- 1 cup milk
- 4 cups powdered sugar
- 1/2 cup unsalted butter, softened (for frosting)
- 2–3 tbsp heavy cream (for frosting)
- Additional vanilla beans for decoration (optional)
Instructions
- Preheat your oven to 350°F (175°C). Grease and flour three 9-inch round cake pans.
- Whisk together the flour, baking powder, and salt in a bowl.
- Cream the softened butter and sugar until light and fluffy. Add eggs one at a time, mixing well after each addition. Stir in vanilla extract and vanilla bean seeds.
- Combine the dry ingredients with the wet mixture, alternating with milk until just combined.
- Bake for 25-30 minutes or until a toothpick comes out clean.
- Cool the cakes in the pans for 10 minutes, then transfer to wire racks to cool completely.
- Make the frosting by beating softened butter in a bowl until creamy. Gradually add powdered sugar and mix until smooth, adjusting with heavy cream for the desired consistency.
- Assemble the cake by layering it with frosting and covering the entire cake.
- Garnish with additional vanilla bean seeds if desired, and serve.
Notes
Ensure butter is at room temperature for better creaming; let cakes cool completely to prevent frosting from melting.
Nutrition
- Serving Size: 1 slice
- Calories: 480
- Sugar: 40g
- Sodium: 150mg
- Fat: 23g
- Saturated Fat: 14g
- Unsaturated Fat: 6g
- Trans Fat: 0g
- Carbohydrates: 67g
- Fiber: 0g
- Protein: 4g
- Cholesterol: 100mg