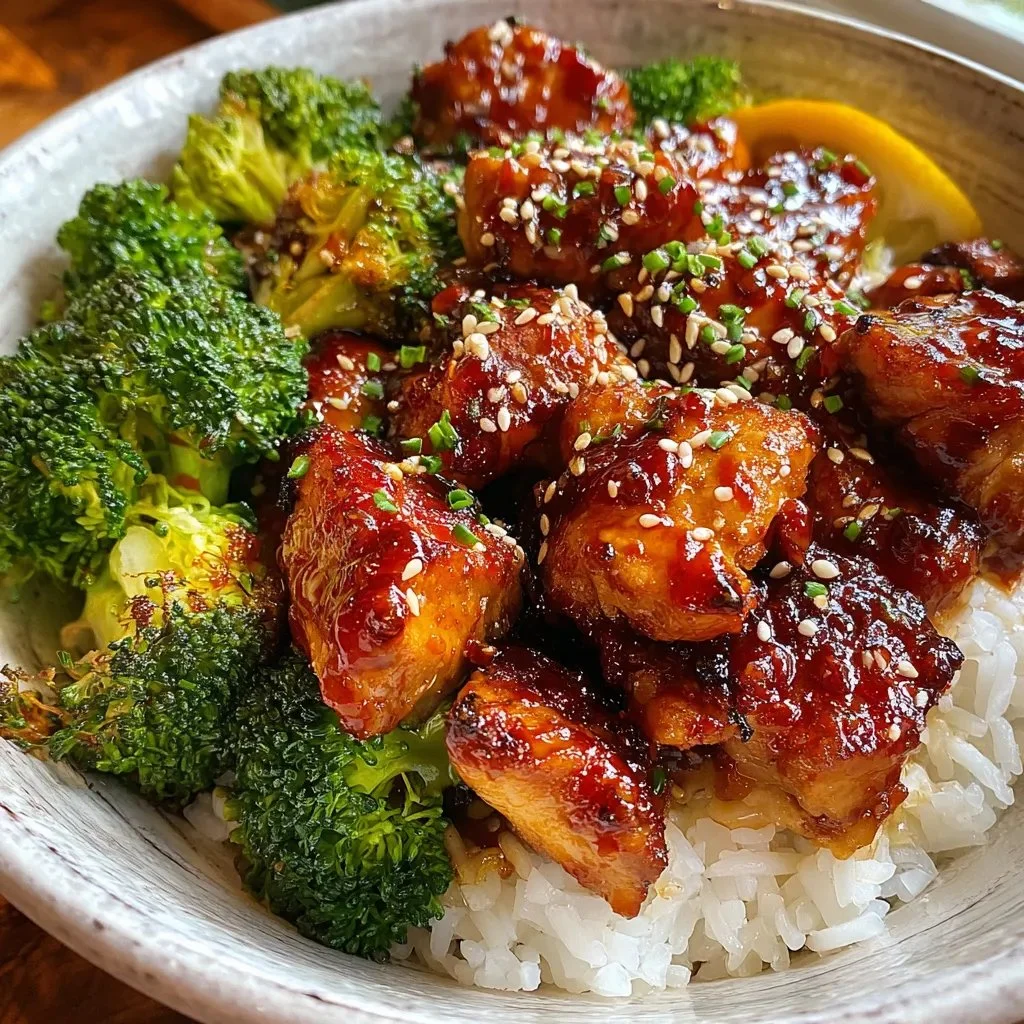
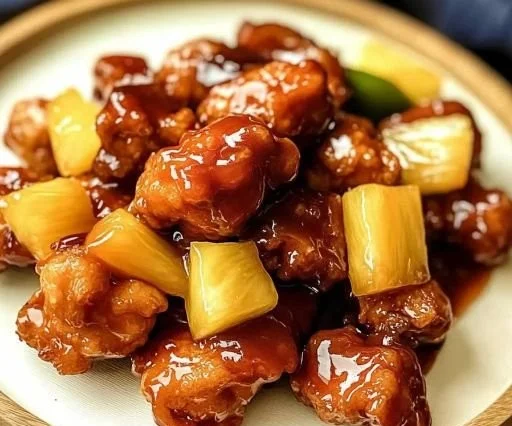
It’s a humid Sunday afternoon when I first attempted a beloved childhood dish: Sweet and Sour Chicken. The smell wafting through the kitchen immediately transported me back to those weekends when my family would gather around takeout containers, sharing stories and laughter. There’s just something magical about food that creates such lasting memories, isn’t there? Today, I’m not relying on takeout—I’m making Crispy Homemade Sweet and Sour Chicken from scratch, brimming with vibrant colors and flavors.
The combination of succulent chicken, zesty sauce, and crunchy vegetables makes this dish a winner in any household. And the best part? You can control every ingredient, tweaking to fit your family’s taste. So, roll up your sleeves and let’s dive into making this delightful dish that you’ll surely love!
Recipe Timing
- Prep Duration: 20 minutes
- Active Cooking: 30 minutes
- Total Duration: 50 minutes
- Portion Size: Serves 4
- Complexity: Simple
Nutritional Recipe
- Calories per portion: Approximately 350
- Protein: 25 grams
- Carbs: 55 grams
- Fats: 10 grams
- Fiber: 2 grams
- Sugars: 22 grams
- Sodium: 800 mg
Why You’ll Love This Crispy Homemade Sweet and Sour Chicken
This dish perfectly strikes the balance between sweet and tangy, satisfying your cravings while being a fun, flavorful experience. The chicken is delightfully crispy, and the pineapple and bell peppers add a refreshing crunch that complements the rich sauce. Plus, it’s a dish that invites conversation and connection—perfect for family dinners or casual gatherings with friends.
The Complete Cooking Journey
Gathering around the table for a home-cooked meal cultivates connection, warmth, and joy. This Crispy Sweet and Sour Chicken not only delights the palate but also brings people together, allowing memories to form over shared plates. Why settle for lesser takeout when you can create this experience at home?
Ingredients:
- 1 lb Boneless Chicken, cut into cubes (options for dark or white meat)
- 1 cup Corn Starch, divided (consider using potato starch for extra crunch)
- 1/4 cup Tomato Paste (forms the base of the sauce)
- 1/2 cup White Vinegar (provides tanginess)
- 1/2 cup Sugar (balances the vinegar’s tartness)
- 2 tablespoons Soy Sauce (adds savory umami flavor)
- 1/4 cup Water (thin the sauce to desired consistency)
- 2 teaspoons Corn Starch Slurry (for thickening the sauce)
- 1/2 cup Bell Pepper, cut into 1-inch cubes (any variety can be used)
- 1/2 cup Pineapple, cut into chunks (fresh preferred)
- 1/2 medium White Onion, cut into 1-inch cubes (adds aromatic flavor)
- 2 cloves Garlic, minced (enhances overall flavor)
- 1 slice Ginger, grated (adds warmth and spiciness)
Method:
Step 1: Prep Your Chicken
Start by rinsing the boneless chicken and patting it dry. Cut it into bite-sized cubes and set aside as you prepare the coating.
Step 2: Coat the Chicken
In a bowl, add half of the corn starch (about 1/2 cup). Toss the chicken cubes in the starch until evenly coated. This helps achieve that addictive crispy texture later on!
Step 3: Heat the Oil
In a large skillet or wok, heat vegetable oil over medium-high heat. You want enough oil to cover the base of your pan well.
Step 4: Fry the Chicken
Once the oil is hot (you can test it by dropping a little corn starch into the oil), carefully place the coated chicken pieces in the oil. Fry in batches to avoid overcrowding, letting them cook for about 5-7 minutes until golden brown and crispy. Remove and drain on paper towels.
Step 5: Prepare the Sweet and Sour Sauce
In a separate bowl, whisk together the tomato paste, white vinegar, sugar, soy sauce, and water. This will form the sweet and tangy base of your dish.
Step 6: Thicken the Sauce
In the same pan where you fried the chicken, add minced garlic, grated ginger, onions, bell peppers, and pineapple. Stir-fry for a few minutes until they begin to soften.
Step 7: Mix in the Sauce
Pour your prepped sweet and sour sauce over the sautéed vegetables. Let it bubble gently for a couple of minutes.
Step 8: Combine Chicken and Sauce
Add the crispy chicken back into the pan with the sauce and toss everything together until it is well-coated. To thicken, mix the remaining corn starch with a bit of water to create a slurry and stir it in until you reach the desired consistency.
Step 9: Simmer
Let the mixture simmer for an additional minute or two for flavors to meld together before serving.
Step 10: Plate and Serve
Serve this vibrant dish hot over a bed of fluffy rice or alongside steamed vegetables!
Serving Suggestions & Pairings
Crispy Sweet and Sour Chicken is fantastic served over a mound of jasmine rice, which soaks up the sweet sauce beautifully. Consider pairing it with a simple side salad for freshness or spring rolls for a delightful appetizer.
Storage & Leftovers Guide
If you find yourself with leftovers (though it’s quite the crowd-pleaser), store them in an airtight container in the fridge for up to 3 days. Reheat gently on the stove or in the microwave, adding a splash of water if needed to reclaim its original texture.
Kitchen Wisdom & Success Tips
- Stay Conscious of Oil Temperature: If your oil is too cold, the chicken will absorb oil and lose crispiness; too hot, and it may burn.
- Experiment with Veggies: Feel free to swap out vegetables for others in your fridge—broccoli or snap peas would add a lovely crunch!
- Sweetness Level: Adjust the sugar based on your preference. Add a bit more for a sweeter sauce or reduce it for a tangier bite.
Flavor Variations & Adaptations
For those who enjoy heat, add some chili flakes or sriracha to your sauce! Craving an alternative protein? This recipe works brilliantly with shrimp or tofu.
Reader Questions & Solutions
-
Question: Can I make this dish ahead of time?
- Answer: Yes! Prepare the chicken and sauce separately and combine them right before serving.
-
Question: How do I make it gluten-free?
- Answer: Substitute soy sauce with tamari or a gluten-free alternative and ensure your cornstarch is certified gluten-free.
-
Question: Can I use frozen chicken?
- Answer: Yes, just ensure it’s fully thawed and dried before coating it with cornstarch.
-
Question: My chicken is soggy! What went wrong?
- Answer: Ensure the chicken is fully dry before coating and fry it in small batches to maintain oil temperature.
-
Question: What to serve if I don’t have rice?
- Answer: Try quinoa or even cauliflower rice as a lovely low-carb alternative.
Wrapping Up
Creating Crispy Homemade Sweet and Sour Chicken from scratch is so fulfilling and allows customization that restaurant versions just can’t match. This dish not only nourishes but also creates delightful moments around the table that will linger in fond memories. So gather your ingredients, unleash your inner chef, and enjoy the process as much as the meal itself—happy cooking!
PrintCrispy Homemade Sweet and Sour Chicken

A delightful dish combining crispy chicken with a vibrant sweet and sour sauce, perfect for family dinners.
- Prep Time: 20 minutes
- Cook Time: 30 minutes
- Total Time: 50 minutes
- Yield: 4 servings 1x
- Category: Main Course
- Method: Frying
- Cuisine: Chinese
- Diet: Gluten-Free
Ingredients
- 1 lb Boneless Chicken, cut into cubes
- 1 cup Corn Starch, divided
- 1/4 cup Tomato Paste
- 1/2 cup White Vinegar
- 1/2 cup Sugar
- 2 tablespoons Soy Sauce
- 1/4 cup Water
- 2 teaspoons Corn Starch Slurry
- 1/2 cup Bell Pepper, cut into 1-inch cubes
- 1/2 cup Pineapple, cut into chunks
- 1/2 medium White Onion, cut into 1-inch cubes
- 2 cloves Garlic, minced
- 1 slice Ginger, grated
Instructions
- Prep Your Chicken
- Coat the Chicken
- Heat the Oil
- Fry the Chicken
- Prepare the Sweet and Sour Sauce
- Thicken the Sauce
- Mix in the Sauce
- Combine Chicken and Sauce
- Simmer
- Plate and Serve
Notes
For extra crunch, consider using potato starch instead of corn starch. Serve over jasmine rice or alongside spring rolls.
Nutrition
- Serving Size: 1 serving
- Calories: 350
- Sugar: 22g
- Sodium: 800mg
- Fat: 10g
- Saturated Fat: 1g
- Unsaturated Fat: 7g
- Trans Fat: 0g
- Carbohydrates: 55g
- Fiber: 2g
- Protein: 25g
- Cholesterol: 70mg