
There’s something magical about party treats that can light up any gathering, and today, I’m thrilled to share my beloved Strawberry Shortcake Cake Pops! Imagine a lovely sunny afternoon, surrounded by friends, laughter echoing in the air, and these sweet, little pops making an appearance. They’re not just desserts; they’re a delightful way to spread joy, perfectly portioned for sharing. Plus, they bring a burst of strawberry flavor and creamy sweetness that’s simply irresistible!
What I love about these cake pops is how easy they are to make. The combination of fluffy strawberry cake, fresh strawberries, and rich white chocolate creates an unforgettable treat that everyone will adore. Let’s dive into the details!
Recipe Timing
- Prep Duration: 20 minutes
- Active Cooking: 30 minutes
- Total Duration: 1 hour 20 minutes
- Portion Size: About 20 cake pops
- Complexity: Simple
Nutritional Recipe
- Calories per portion: 130
- Protein: 2g
- Carbs: 17g
- Fats: 6g
- Fiber: 0g
- Sugars: 10g
- Sodium: 60mg
Why You’ll Love This Strawberry Shortcake Cake Pops for Parties
These strawberry shortcake cake pops are more than just a treat; they’re a visual delight and a flavorful explosion! Perfect for birthdays, bridal showers, or just because, they’re fun to make and even more fun to eat. Plus, the personalization options are endless. Whether you stick with classic sprinkles or add your unique touch, these pops will surely impress your guests!
The Complete Cooking Journey
Let’s get started on this delightful journey from ingredients to pops on a stick!
Ingredients:
- 1 box strawberry cake mix
- 3 large eggs
- 1/2 cup vegetable oil
- 1 cup water
- 1 cup whipped cream
- 1 cup strawberries, chopped
- 1 cup white chocolate melting wafers
- Sprinkles for decoration
Method:
Step 1: Preheat and Prepare the Cake Mix
Preheat your oven and follow the package instructions to prepare the cake mix. Pour it into a greased pan and bake until golden brown. The aroma will be irresistible!
Step 2: Cool and Crumble
Once your cake is baked, let it cool completely. Once cool, crumble it into a large bowl, thinking of all the laughter it’ll inspire at your gathering.
Step 3: Combine Whipped Cream and Strawberries
Mix in the whipped cream and chopped strawberries into the crumbled cake until everything is well combined. This is where the magic happens; the mixture should be moist and flavorful!
Step 4: Form the Cake Pops
Now, it’s time to roll up your sleeves! Form the mixture into small balls and place them on a baking sheet. Don’t worry about perfection; each pop will have its unique character.
Step 5: Freeze for Firmness
Pop the baking sheet into the freezer for about 30 minutes. This helps the cake balls firm up and makes them easier to work with later.
Step 6: Melt the White Chocolate
While the cake pops are chilling, melt the white chocolate melting wafers according to package instructions. This step is crucial for achieving that luscious coating.
Step 7: Prepare the Lollipop Sticks
Dip the tip of a lollipop stick into the melted chocolate and insert it into the center of each cake pop. This gives each pop stability and a delightful twist of flavor.
Step 8: Dip into the Chocolate
Now comes the fun part! Dip each cake pop into the melted chocolate, allowing any excess to drip off. This coating is what makes these pops so irresistible.
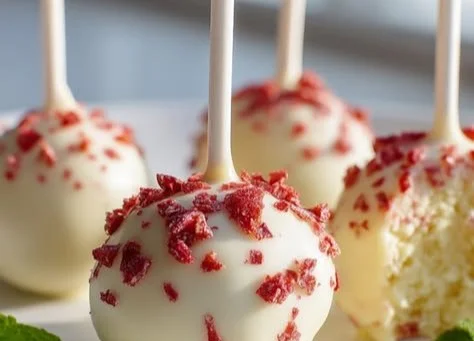
Step 9: Decorate with Sprinkles
While the chocolate is still wet, sprinkle on some colorful sprinkles. This is your chance to have fun and get creative!
Step 10: Set and Chill
Allow the cake pops to set by placing them upright in a foam block or a stand. This helps keep their shape until the chocolate hardens.
Step 11: Serve and Enjoy
Once set, your strawberry shortcake cake pops are ready for their big debut. Gather your friends and family, and enjoy every succulent bite together!
Serving Suggestions & Pairings
These cake pops are perfect on their own, but they can also be paired with some fresh whipped cream and extra strawberries for a delightful touch. Serve them alongside a chilled sparkling lemonade or a creamy milkshake for a truly festive feel.
Storage & Leftovers Guide
Store any leftovers in an airtight container in the fridge for up to a week. If you want to keep them for longer, they can be frozen for up to 2 months. Just make sure they’re separated so they don’t stick together.
Kitchen Wisdom & Success Tips
- Make sure your cake is completely cool before crumbling; this will make it easier to form the pops.
- If the mixture is too dry, add a little more whipped cream until desired consistency is reached.
- When melting chocolate, do it slowly to avoid burning; a microwave works well in 30-second intervals!
Flavor Variations & Adaptations
Feel free to experiment! You can swap the cake mix for any flavor or incorporate different fruits into the mixture. Consider adding a splash of vanilla extract for an extra layer of flavor or using dark chocolate for a bolder coating.
Reader Questions & Solutions
-
What can I do if my cake pops are falling off the sticks?
Ensure the cake mixture is sufficiently firm and fully chilled. Freezing them before coating helps hold everything in place. -
Can I use a different type of chocolate?
Absolutely! Milk chocolate or dark chocolate can give a unique twist. -
Can I use homemade cake instead of a cake mix?
Yes, just make sure it’s a dense cake to hold its shape. -
How do I transport cake pops without damaging them?
Use a foam block to keep them upright during transport. You can also place them in a secure box with dividers. -
What if I don’t have lollipop sticks?
No worries! You can use toothpicks or serve them directly with forks.
Wrapping Up
These Strawberry Shortcake Cake Pops are a delightful way to celebrate any occasion. With their charming appearance and delicious flavor, they’re sure to become a favorite dessert. I hope you enjoy making and sharing them as much as I do! So gather your ingredients, start mixing, and let the sweetness unfold! Happy baking!