
There’s something truly nostalgic about a warm, cheesy slice of pan pizza that brings back memories of lazy weekends spent with family or friends. As a child, I remember those moments when the aroma of freshly baked pizza wafted through the air, making my stomach growl in anticipation. It’s hard to beat that crispy, golden crust paired with gooey mozzarella and your favorite toppings. Today, I’m excited to share a recipe that not only captures that rich flavor we adore from Pizza Hut but also fills our homes with the warmth and comfort of homemade goodness.
Recipe Timing
- Prep Duration: 10 minutes
- Active Cooking: 15-20 minutes
- Total Duration: 1 hour 30 minutes
- Portion Size: Serves 4-6
- Complexity: Simple
Nutritional Recipe
- Calories per portion: Approximately 300
- Protein: 12 grams
- Carbs: 40 grams
- Fats: 10 grams
- Fiber: 2 grams
- Sugars: 1 gram
- Sodium: 500 mg
Why You’ll Love This Authentic Pizza Hut Pan Pizza Recipe – Crispy & Delicious
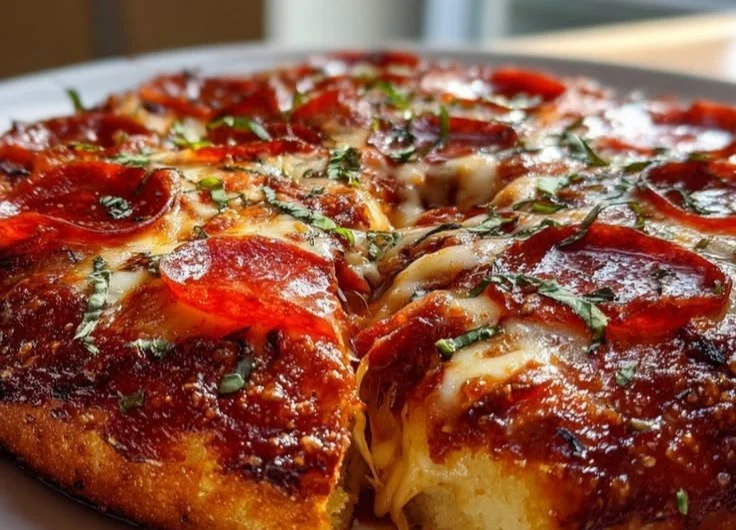
Imagine biting into a slice where the crust is perfectly crispy on the outside, yet delightfully soft and chewy inside. This Authentic Pizza Hut Pan Pizza recipe captures the essence of that beloved pizza experience with its incredible texture and flavor profile. Not to mention, it’s highly customizable! Whether you prefer pepperoni, veggies, or a gourmet twist, this recipe is your canvas. It’s so easy to make from scratch that you might find yourself ditching takeout altogether. Plus, the satisfaction of creating such a classic dish in your own kitchen is simply unmatched.
The Complete Cooking Journey
Embarking on this culinary adventure, you’ll begin with mixing simple ingredients to create a fluffy dough. As it rises, your kitchen will fill with the warm, inviting smells of baking bread. Once it’s time to top your pizza, the choices are endless. Load it up with your favorite toppings and slide it into the oven, where it will transform into the cheesy, crispy delight we all love.
Ingredients:
- 2 1/4 teaspoons active dry yeast
- 1 teaspoon sugar
- 1 cup warm water (110°F)
- 2 1/2 to 3 cups all-purpose flour
- 1 teaspoon salt
- 2 tablespoons olive oil
- Pizza sauce
- Shredded mozzarella cheese
- Toppings of choice (pepperoni, bell peppers, onions, etc.)
Method:
Step 1: Dissolve the Yeast
In a small bowl, dissolve the yeast and sugar in warm water. Let it sit for about 5 minutes until frothy.
Step 2: Combine Dry Ingredients
In a large mixing bowl, combine 2 1/2 cups of flour and salt. Make a well in the center and add the yeast mixture and olive oil.
Step 3: Mix and Knead the Dough
Mix until a dough begins to form, then knead for about 5-7 minutes, adding more flour as needed until the dough is smooth.
Step 4: Let the Dough Rise
Place the dough in a greased bowl, cover, and let it rise in a warm area for 1 hour or until doubled in size.
Step 5: Preheat and Prepare the Pan
Preheat the oven to 475°F (245°C) and grease a 14-inch pizza pan.
Step 6: Shape the Dough
Punch down the dough and press it into the pizza pan. Cover with a cloth and let it rise for 15-20 minutes.
Step 7: Sauce and Top Your Pizza
Spread pizza sauce over the dough, layer cheese, and add desired toppings.
Step 8: Bake to Perfection
Bake in the preheated oven for 15-20 minutes, or until the crust is golden brown and the cheese is bubbly.
Step 9: Serve and Enjoy
Remove from the oven, let cool slightly, slice, and serve.
Serving Suggestions & Pairings
This pan pizza is perfect for casual family dinners or movie nights! Pair it with a fresh garden salad for a refreshing contrast, or serve it alongside some garlic knots or crispy breadsticks. For those who love a little kick, a side of spicy marinara or ranch dressing for dipping can elevate your experience.
Storage & Leftovers Guide
Leftover pizza can be your best friend! Store any uneaten slices in an airtight container in the refrigerator for up to 3 days. For longer storage, place slices in freezer-safe bags and pop them in the freezer where they can last for about 2 months. Reheat in the oven or toaster oven for that fresh-out-of-the-oven goodness.
Kitchen Wisdom & Success Tips
Getting the dough right is key! Make sure your water is at the right temperature (not too hot) to activate the yeast effectively. Kneading is crucial, so don’t rush that step! If you find the dough too sticky, gradually add flour until it reaches a smooth consistency. Lastly, let your pizza rise adequately—it’s worth the wait!
Flavor Variations & Adaptations
Feel free to mix and match toppings based on what you love. Try a BBQ chicken version with barbecue sauce, grilled chicken, and cilantro. Or go vegetarian with an array of colorful veggies like spinach, mushrooms, and olives. For a gourmet touch, drizzle with balsamic glaze or hot honey after baking.
Reader Questions & Solutions
-
Q: What can I substitute for active dry yeast?
A: You can use instant yeast; just skip the activation step and add it directly to your flour. -
Q: Can I use whole wheat flour?
A: Yes! You can substitute half of the all-purpose flour with whole wheat flour for a healthier option. -
Q: My dough isn’t rising. What could be wrong?
A: Ensure your yeast is fresh and your water is warm, not hot. If it still fails, check the temperature in your kitchen; it might be too cold. -
Q: How do I make my pizza crust crispier?
A: Bake on a preheated stone or a greased pan to help achieve that desired crispiness. -
Q: Can I prepare the dough ahead of time?
A: Absolutely! Prepare and let it rise, then punch it down and store in the refrigerator for up to 24 hours before shaping and baking.
Wrapping Up
Creating this Authentic Pizza Hut Pan Pizza at home is not just about making dinner; it’s about sharing love, warmth, and joy with those around you. So gather your ingredients, roll up your sleeves, and embark on this flavorful adventure. I can assure you, once you experience the charm of making your own pan pizza, there’sno turning back! Enjoy every delicious bite, and happy cooking!
PrintAuthentic Pizza Hut Pan Pizza

A nostalgic pan pizza recipe that captures the essence of Pizza Hut with a crispy crust and gooey cheese.
- Prep Time: 10 minutes
- Cook Time: 20 minutes
- Total Time: 90 minutes
- Yield: 4-6 servings 1x
- Category: Main Course
- Method: Baking
- Cuisine: Italian
- Diet: Vegetarian
Ingredients
- 2 1/4 teaspoons active dry yeast
- 1 teaspoon sugar
- 1 cup warm water (110°F)
- 2 1/2 to 3 cups all-purpose flour
- 1 teaspoon salt
- 2 tablespoons olive oil
- Pizza sauce
- Shredded mozzarella cheese
- Toppings of choice (pepperoni, bell peppers, onions, etc.)
Instructions
- Dissolve the yeast and sugar in warm water. Let it sit for about 5 minutes until frothy.
- Combine flour and salt in a bowl. Make a well in the center and add the yeast mixture and olive oil.
- Mix until a dough begins to form, then knead for about 5-7 minutes until smooth.
- Let the dough rise in a greased bowl for 1 hour or until doubled in size.
- Preheat the oven to 475°F (245°C) and grease a 14-inch pizza pan.
- Shape the dough by pressing it into the pizza pan and letting it rise for another 15-20 minutes.
- Spread pizza sauce over the dough, layer cheese, and add toppings.
- Bake for 15-20 minutes or until the crust is golden brown and cheese is bubbly.
- Remove from the oven, let cool slightly, slice, and serve.
Notes
For best results, ensure your water temperature is correct and knead the dough well. Leftovers can be stored in the fridge for up to 3 days.
Nutrition
- Serving Size: 1 serving
- Calories: 300
- Sugar: 1g
- Sodium: 500mg
- Fat: 10g
- Saturated Fat: 3g
- Unsaturated Fat: 7g
- Trans Fat: 0g
- Carbohydrates: 40g
- Fiber: 2g
- Protein: 12g
- Cholesterol: 0mg