
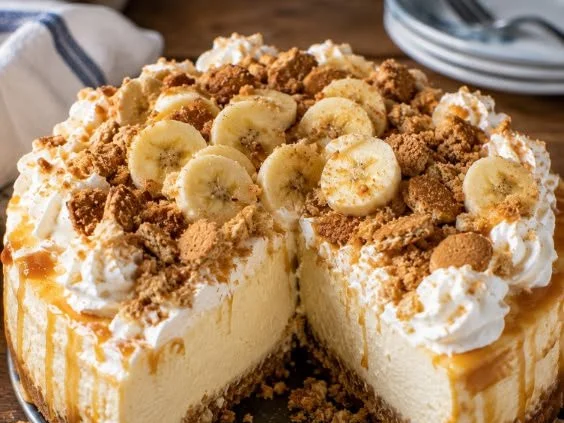
As a child, some of my most cherished memories were made in my grandmother’s cozy kitchen, where the sweet aroma of desserts wafted through the air. One of her signature treats was banana pudding, layered lovingly in small glass dishes. I remember her playful laughter as she added crushed vanilla wafers, telling me they were the “crunch that brings it all together.” Fast forward to today, and I’ve taken that cherished dessert and transformed it into something even more delightful—a Banana Pudding Crunch Cheesecake. This creamy, dreamy dessert marries rich cheesecake with layers of luscious banana pudding, all while sporting a delightful crispy crust. It’s a treat that evokes nostalgia while offering a fresh twist – perfect for gatherings or simple indulgence at home.
Recipe Timing
- Prep Duration: 30 minutes
- Active Cooking: 15 minutes
- Total Duration: 4 hours 45 minutes (including chilling)
- Portion Size: Serves 10
- Complexity: Simple
Nutritional Recipe
- Calories per portion: Approximately 320
- Protein: 4g per serving
- Carbs: 40g per serving
- Fats: 18g per serving
- Fiber: 1g per serving
- Sugars: 17g per serving
- Sodium: 220mg per serving
Why You’ll Love This Banana Pudding Crunch Cheesecake
This dessert is a celebration of textures and flavors that seamlessly blend comfort with sophistication. The first bite delivers the creamy richness of the cheesecake, perfectly balanced by the sweet, velvety banana pudding. Those layers of soft bananas add a freshness that rounds out each mouthful, while the crunch of the vanilla wafer crust brings an irresistible juxtaposition to the creaminess. Additionally, it’s a make-ahead dessert that can be prepared with ease, leaving you more time to spend creating memories with your loved ones.
The Complete Cooking Journey
Let’s dive into this delicious culinary adventure that transforms simple ingredients into a show-stopping dessert.
Ingredients:
- 1 ½ cups vanilla wafers, crushed
- 1/2 cup butter, melted
- 2 cups cream cheese, softened
- 1 cup powdered sugar
- 1 tsp vanilla extract
- 2 cups banana pudding (prepared)
- 2 ripe bananas, sliced
- 1 cup whipped cream
- Additional crushed vanilla wafers for topping
Method:
Step 1: Prep Your Oven and Crust
Preheat the oven to 325°F (160°C). In a bowl, combine the crushed vanilla wafers and melted butter, stirring until the crumbs are evenly coated. Press this mixture firmly into the bottom of a springform pan to form the crust.
Step 2: Mix the Cream Cheese Filling
In a separate mixing bowl, beat together the cream cheese, powdered sugar, and vanilla extract until the mixture is smooth and creamy. This forms the luscious base of your cheesecake.
Step 3: Layer the Goodness
Spread half of your cream cheese mixture over the prepared crust. Follow this with a generous layer of banana pudding and arrange sliced bananas evenly on top. Repeat this layering process with the remaining cream cheese mixture and pudding for a dessert that’s filled with delightful surprises.
Step 4: Finish with Whipped Cream
Top your layered cheesecake with a heavenly cloud of whipped cream. For that extra crunch and flavor, sprinkle additional crushed vanilla wafers on top, completing the charming presentation.
Step 5: Chill and Set
Cover the springform pan with plastic wrap and refrigerate your cheesecake for at least 4 hours, or until it’s fully set and ready to slice.
Serving Suggestions & Pairings
Serve this Banana Pudding Crunch Cheesecake chilled, ideally garnished with a sprinkle of crushed vanilla wafers and a few fresh banana slices on top. It pairs beautifully with a cup of coffee or a tall glass of cold milk, making it a perfect dessert for brunches or summer barbecues.
Storage & Leftovers Guide
If you have any leftovers (which is rare with this showstopper!), store them in an airtight container in the refrigerator for up to 3 days. This cheesecake can also be frozen for up to a month—just be sure to wrap it tightly to prevent freezer burn.
Kitchen Wisdom & Success Tips
- Be Sure to Soften Your Cream Cheese: Start with softened cream cheese to create a smooth and creamy filling without lumps.
- Use Ripe Bananas: The riper the bananas, the sweeter and more flavorful they will be in your cheesecake.
- Chill Well: Don’t skimp on the chilling time! This helps the flavors meld together beautifully and ensures a clean slice.
Flavor Variations & Adaptations
Feeling adventurous? Consider adding a layer of crushed strawberries or a drizzle of caramel sauce between the banana pudding and cream cheese layers. You could also swap out some of the vanilla wafers for crushed graham crackers for a unique touch!
Reader Questions & Solutions
-
Q: Can I use a different type of pudding?
A: Absolutely! Feel free to experiment with chocolate or butterscotch pudding for a fun twist on flavors. -
Q: My cheesecake is too soft; what went wrong?
A: It may need more chilling time. Make sure to refrigerate it for at least 4 hours or until fully set. -
Q: Can I make this cheesecake dairy-free?
A: Yes, you can use dairy-free cream cheese and alternate puddings, just check for suitable vegan-friendly whipped cream, too! -
Q: Can I double the recipe?
A: Definitely! Just use a larger springform pan and adjust the chilling time accordingly. -
Q: Why did my crust crumble when cutting?
A: Ensure you press the crust mixture firmly into the springform pan and let it cool to set properly before adding the filling.
Wrapping Up
This Banana Pudding Crunch Cheesecake is a delightful fusion of flavors and textures that is sure to become a favorite in your household, just as it did in mine. Perfect for any occasion, or simply a Tuesday afternoon treat, this dessert celebrates the simplicity of good ingredients and good company. So, gather your loved ones, whip up this scrumptious cheesecake, and enjoy the delicious bliss that unfolds with every slice! Happy baking!
PrintBanana Pudding Crunch Cheesecake
A creamy cheesecake layered with luscious banana pudding and a crunchy vanilla wafer crust, evoking nostalgic flavors with a delightful twist.
- Prep Time: 30 minutes
- Cook Time: 15 minutes
- Total Time: 285 minutes
- Yield: 10 servings 1x
- Category: Dessert
- Method: Chilling and Baking
- Cuisine: American
- Diet: Vegetarian
Ingredients
- 1 ½ cups vanilla wafers, crushed
- ½ cup butter, melted
- 2 cups cream cheese, softened
- 1 cup powdered sugar
- 1 tsp vanilla extract
- 2 cups banana pudding (prepared)
- 2 ripe bananas, sliced
- 1 cup whipped cream
- Additional crushed vanilla wafers for topping
Instructions
- Preheat the oven to 325°F (160°C). In a bowl, combine the crushed vanilla wafers and melted butter, stirring until the crumbs are evenly coated. Press this mixture firmly into the bottom of a springform pan to form the crust.
- Beat together the cream cheese, powdered sugar, and vanilla extract until the mixture is smooth and creamy. This forms the luscious base of your cheesecake.
- Spread half of your cream cheese mixture over the prepared crust. Follow this with a generous layer of banana pudding and arrange sliced bananas evenly on top. Repeat this layering process with the remaining cream cheese mixture and pudding.
- Top your layered cheesecake with a heavenly cloud of whipped cream and sprinkle additional crushed vanilla wafers on top.
- Cover the springform pan with plastic wrap and refrigerate your cheesecake for at least 4 hours, or until it’s fully set.
Notes
For best results, use ripe bananas and allow ample chilling time for the cheesecake to set properly.
Nutrition
- Serving Size: 1 slice
- Calories: 320
- Sugar: 17g
- Sodium: 220mg
- Fat: 18g
- Saturated Fat: 9g
- Unsaturated Fat: 5g
- Trans Fat: 0g
- Carbohydrates: 40g
- Fiber: 1g
- Protein: 4g
- Cholesterol: 30mg