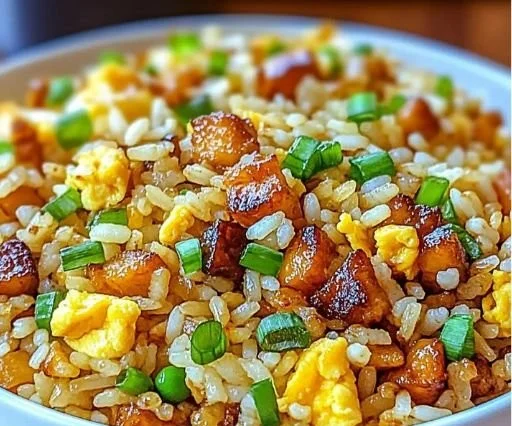
Every now and then, a dish comes along that transforms a mundane evening into a vibrant culinary adventure. For me, that dish is Hibachi Fried Rice. I remember the first time I tried it at a bustling hibachi restaurant where the chef was a whirlwind of flames and sizzling sounds. The aroma that danced around was intoxicating, filled with the warmth of soy sauce, the sweetness of fresh vegetables, and the satisfying richness of eggs. As I savored every bite, I felt as if I were transported to a lively, outdoor market in Japan.
The thrill of recreating that experience at home was irresistible. With just a few pantry staples, you can whip up a colorful, flavorful bowl of Hibachi Fried Rice that rivals any restaurant version. Not only is it quick to prepare, but it also offers a world of flavors in every bite—a true testament to the power of cooking!
Recipe Timing
- Prep Duration: 10 minutes
- Active Cooking: 10 minutes
- Total Duration: 20 minutes
- Portion Size: Serves 4
- Complexity: Simple
Nutritional Recipe
- Calories per portion: 300
- Protein: 10 grams
- Carbs: 42 grams
- Fats: 10 grams
- Fiber: 3 grams
- Sugars: 2 grams
- Sodium: 560 mg
Why You’ll Love This Hibachi Fried Rice: Quick, Flavorful Bliss at Home
Hibachi Fried Rice is not just a dish; it’s an invitation to bring the culinary magic of a sizzling Japanese grill right into your kitchen. What makes this dish so special? It’s incredibly adaptable, allowing you to express your creativity with whatever ingredients you have on hand. Plus, with the rich umami from the soy sauce and the vibrant colors from fresh vegetables, your meal will taste as good as it looks. It’s a one-pan wonder that’s perfect for busy weeknights or a laid-back weekend dinner, impressing family and friends alike!
The Complete Cooking Journey
Ready to embark on a delicious adventure? Let’s dive into this cooking journey, where every step brings you closer to that satisfying plate of Hibachi Fried Rice.
Ingredients:
- 4 cups Cooked Rice (Using day-old rice is best.)
- 2 tablespoons Vegetable Oil (Opt for neutral oils like canola.)
- 1 cup Mixed Fresh Vegetables (Carrots, peas, and green onions.)
- 2 large Eggs (Adds richness and protein.)
- 3 tablespoons Low-Sodium Soy Sauce (Provides umami flavor.)
- 1 teaspoon Garlic Powder (Enhances flavor without needing fresh garlic.)
- To taste Salt (Adjust quantity according to personal preference.)
- To taste Pepper
Method:
Step 1: Prepare Your Ingredients
Gather all your ingredients—make sure that your cooked rice is ready to go. If you have leftover rice sitting in the fridge from last night, that’s even better. Day-old rice has the perfect texture for frying.
Step 2: Heat the Oil
In a large skillet or wok, heat up the vegetable oil on medium-high heat until it’s shimmering. This is where the magic begins!
Step 3: Sauté the Vegetables
Add the mixed fresh vegetables to the skillet, sautéing them for about 3-4 minutes until they’re tender and vibrant. The colors alone will brighten your kitchen!
Step 4: Scramble the Eggs
Push the vegetables to one side of the skillet, then crack the eggs into the empty space. Scramble them gently until they’re just set, then mix them with the vegetables. The smell is incredible!
Step 5: Add the Rice
Now it’s time for the star of the show! Add the cooked rice to the skillet, breaking up any clumps gently with a spatula so that it combines well with the veggies and eggs.
Step 6: Season it Up
Drizzle the low-sodium soy sauce over the rice. Sprinkle in the garlic powder, salt, and pepper, stirring continuously until every grain of rice is properly coated. This is where the flavor blooms!
Step 7: Final Sauté
Let the rice sizzle in the pan for another couple of minutes, stirring occasionally. This helps create that lovely fried texture, and golden edges of the rice.
Step 8: Serve and Enjoy!
Once everything is heated through, transfer your Hibachi Fried Rice to a serving dish. Take in the aromatic bliss before digging in!
Serving Suggestions & Pairings
Hibachi Fried Rice pairs beautifully with grilled chicken, beef, or shrimp. For a refreshing touch, serve it alongside a simple cucumber salad or miso soup. You can also sprinkle some sesame seeds or extra chopped green onions on top for added crunch and flavor.
Storage & Leftovers Guide
If you happen to have some delicious leftovers, store them in an airtight container in the refrigerator for up to 3 days. To reheat, simply toss them in a skillet over low heat with a splash of water to revive the texture or microwave for a quick meal.
Kitchen Wisdom & Success Tips
- Make sure your rice is cold—day-old rice dries out a bit, which prevents it from getting mushy when frying.
- Feel free to use whatever vegetables you have on hand, like bell peppers, corn, or even zucchini.
- For an extra kick, add some chili flakes or a splash of sriracha to the mix.
Flavor Variations & Adaptations
Want to spice it up? Try adding cooked meat like chicken, shrimp, or even tofu for a vegetarian option. Experiment with different sauces such as teriyaki for a sweeter finish or go with coconut aminos for a soy-free alternative.
Reader Questions & Solutions
- What if I don’t have leftover rice? No problem! Just cook your rice ahead of time and let it cool completely before using.
- Can I substitute the vegetables? Absolutely! Use any combination of your favorites or whatever is in season.
- Is this dish gluten-free? You can make this gluten-free by opting for tamari instead of soy sauce.
- Can I make this dish vegetarian? Yes! Simply omit any meat and include a protein like scrambled tofu.
- How do I prevent my rice from getting mushy? Ensure your cooked rice is cold and dried out a bit by allowing it to sit in the fridge overnight.
Wrapping Up
Hibachi Fried Rice is more than just a meal; it’s an experience! The joy of cooking becomes evident as you see how simple ingredients can create such a flavorful dish. So, grab your skillet, gather your loved ones, and enjoy a taste of Japan right at your dining table. Happy cooking!
PrintHibachi Fried Rice

A vibrant and flavorful Hibachi Fried Rice that brings the culinary magic of Japan to your kitchen with simple ingredients.
- Prep Time: 10 minutes
- Cook Time: 10 minutes
- Total Time: 20 minutes
- Yield: 4 servings 1x
- Category: Main Course
- Method: Stir-frying
- Cuisine: Japanese
- Diet: Vegetarian
Ingredients
- 4 cups Cooked Rice (preferably day-old)
- 2 tablespoons Vegetable Oil
- 1 cup Mixed Fresh Vegetables (Carrots, peas, and green onions)
- 2 large Eggs
- 3 tablespoons Low-Sodium Soy Sauce
- 1 teaspoon Garlic Powder
- To taste Salt
- To taste Pepper
Instructions
- Prepare Your Ingredients: Gather all your ingredients—make sure that your cooked rice is ready to go.
- Heat the Oil: In a large skillet or wok, heat the vegetable oil on medium-high heat until shimmering.
- Sauté the Vegetables: Add the mixed fresh vegetables to the skillet, sautéing for about 3-4 minutes until tender.
- Scramble the Eggs: Push the vegetables to one side, crack in the eggs, and scramble gently.
- Add the Rice: Stir in the cooked rice, breaking any clumps.
- Season it Up: Drizzle the soy sauce over the rice, add garlic powder, salt, and pepper.
- Final Sauté: Let the rice cook for a couple more minutes, stirring occasionally.
- Serve and Enjoy: Transfer to a serving dish and relish the aromatic bliss!
Notes
Store leftovers in an airtight container in the refrigerator for up to 3 days. Reheat in a skillet with a splash of water to restore texture.
Nutrition
- Serving Size: 1 serving
- Calories: 300
- Sugar: 2g
- Sodium: 560mg
- Fat: 10g
- Saturated Fat: 1g
- Unsaturated Fat: 9g
- Trans Fat: 0g
- Carbohydrates: 42g
- Fiber: 3g
- Protein: 10g
- Cholesterol: 0mg