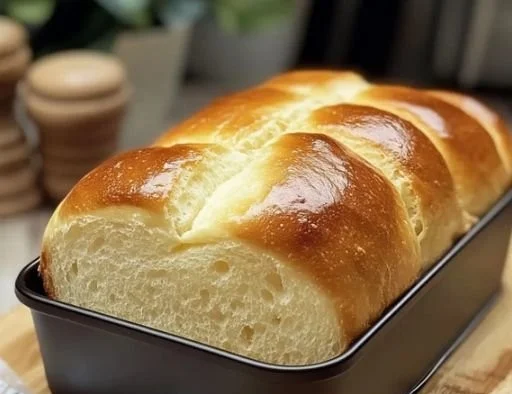
There’s something magical about the aroma of freshly baked bread wafting through the kitchen. It instantly transforms any space into a warm haven. I remember the first time I made homemade bread; my heart raced with excitement as I watched the dough rise, and my kitchen was filled with a comforting scent that reminded me of childhood. I’ve re-created that same cozy feeling with this Quick and Easy 5-Minute Bread recipe, which captures the essence of homemade delight in a fraction of the time.
Recipe Timing
- Prep Duration: 5 minutes
- Active Cooking: 30 minutes
- Total Duration: 35 minutes
- Portion Size: Serves 6-8
- Complexity: Simple
Nutritional Recipe
- Calories per portion: Approximately 150
- Protein: 4g per serving
- Carbs: 30g per serving
- Fats: 1g per serving
- Fiber: 1g per serving
- Sugars: 1g per serving
- Sodium: 200mg per serving
Why You’ll Love This Quick and Easy 5-Minute Bread for Fresh Homemade Delight
Whether you’re a novice in the kitchen or a seasoned pro, this recipe promises success without the fuss. With minimal ingredients and no kneading required, it’s perfect for those busy days when you want something homemade yet hassle-free. Plus, the versatility of this bread allows you to get creative with mix-ins, making it a blank canvas for your culinary masterpieces.
The Complete Cooking Journey
This bread comes together faster than you can say, “What’s for dinner?” With just a few minutes of prep, your oven will do the heavy lifting, yielding deliciously warm and crusty loaves ready to enjoy alongside your favorite meal or just with a spread of butter. Gather your ingredients, and let’s embark on this delightful baking journey.
Ingredients:
- 3 cups All-Purpose Flour (or substitute with whole wheat or bread flour)
- 1 teaspoon Salt (crucial for taste balance)
- 2 teaspoons Instant Yeast (essential for rising)
- 1.5 cups Warm Water (around 110°F or 43°C)
- 1 tablespoon Honey/Sugar (optional for sweetness)
- Gluten-Free Flour Blend (adjust water for a sticky consistency)
- Mix-Ins (e.g. herbs, cheese) (customize to taste)
Method:
Step 1: Gather Your Ingredients
Start by collecting all your ingredients on the counter. The beauty of this recipe is its simplicity—just grab your flour, salt, yeast, warm water, and any extras you want to add for that personal touch.
Step 2: Combine Dry Ingredients
In a large mixing bowl, whisk together 3 cups of all-purpose flour, 1 teaspoon salt, and 2 teaspoons instant yeast. This step is crucial as it ensures even distribution of the yeast and salt throughout the flour.
Step 3: Add Warm Water
Gradually pour in 1.5 cups of warm water (remember, around 110°F or 43°C). If you’re using honey or sugar for sweetness, add that now. The warmth activates the yeast and creates a cozy environment for bubbling up goodness.
Step 4: Stir Until Well Mixed
Using a wooden spoon or your hands, mix the ingredients until they are combined. You want a shaggy, sticky dough to form. Don’t worry about kneading; this bread is all about quick and easy!
Step 5: Let it Rise
Cover the bowl with a damp kitchen towel and let the mixture rise in a warm place for about 20 minutes. This step allows the bread to puff up and develop flavor, making the crust wonderfully crispy.
Step 6: Preheat Your Oven
While the dough is rising, preheat your oven to 375°F (190°C). It’s important to get your oven nice and hot, ensuring a great crust on your bread.
Step 7: Prepare for Baking
Once the dough has risen, transfer it to a greased baking sheet or a baking dish. If you’re adding mix-ins like herbs or cheese, now is the time to sprinkle them on top or fold them into the dough.
Step 8: Bake Your Bread
Place the dough in the preheated oven and bake for about 25-30 minutes, or until the bread is golden brown and sounds hollow when tapped on the bottom. The anticipation will build—trust me!
Step 9: Cool Before Slicing
Once baked, remove the bread from the oven and allow it to cool on a wire rack for at least 10 minutes. This helps finish the cooking process and makes slicing easier.
Step 10: Serve and Enjoy
Now comes the best part—slice your freshly baked bread and enjoy! Spread with butter, serve alongside a hearty soup, or simply savor it on its own.
Serving Suggestions & Pairings
This bread is wonderfully versatile! Pair it with homemade soups, stews, or pasta for a comforting meal. You can also use it for sandwiches—the possibilities are endless. If you have leftover bread, toast it for breakfast or turn it into croutons for salads!
Storage & Leftovers Guide
To store your bread, wrap it in a kitchen towel or plastic wrap and keep it at room temperature for up to 3 days. For longer storage, slice it and place it in a freezer bag. It can be frozen for up to 3 months—just reheat in the oven when you’re ready to enjoy.
Kitchen Wisdom & Success Tips
- Don’t skip the warm water; it activates the yeast and helps the bread rise.
- Experiment with different flours and mix-ins to find your favorite flavor combinations.
- When adding mix-ins, be mindful not to overload the dough; you want it to remain manageable.
Flavor Variations & Adaptations
Feel free to substitute up to half of the all-purpose flour with whole wheat for a nuttier flavor and added nutrition. For a savory bread, consider folding in shredded cheese, chopped herbs, or roasted garlic. For a touch of sweetness, dried fruits like raisins or cranberries work wonderfully.
Reader Questions & Solutions
-
What if I don’t have instant yeast?
You can use active dry yeast instead but be sure to dissolve it in the warm water before mixing it with your dry ingredients. -
Why is my bread dense?
It could be due to not enough rising time or too much flour. Always measure flour accurately. -
Can I double the recipe?
Absolutely! Just ensure you have enough space in your oven and adjust cooking times as necessary. -
What if my dough is too sticky?
Add a little more flour, one tablespoon at a time, until you reach a manageable consistency. -
How can I make this gluten-free?
Use a gluten-free flour blend and adjust the water to achieve the right dough consistency.
Wrapping Up
There you have it—your go-to recipe for delightful homemade bread that comes together in no time. Even on the busiest days, this quick and easy 5-minute bread ensures that the experience of baking can still be a part of your life. So roll up your sleeves, get into that kitchen, and embrace the warmth and joy of baking—your taste buds will thank you!
PrintQuick and Easy 5-Minute Bread
A simple recipe for homemade bread that captures the essence of freshly baked delight in just 5 minutes of prep time.
- Prep Time: 5 minutes
- Cook Time: 30 minutes
- Total Time: 35 minutes
- Yield: 6-8 servings 1x
- Category: Bread
- Method: Baking
- Cuisine: Homemade
- Diet: Vegetarian
Ingredients
- 3 cups All-Purpose Flour
- 1 teaspoon Salt
- 2 teaspoons Instant Yeast
- 1.5 cups Warm Water
- 1 tablespoon Honey or Sugar (optional)
- Gluten-Free Flour Blend (adjust water for consistency)
- Mix-Ins (e.g. herbs, cheese)
Instructions
- Gather your ingredients.
- Combine dry ingredients in a bowl.
- Add warm water gradually.
- Stir until well mixed.
- Let it rise covered for 20 minutes.
- Preheat your oven to 375°F (190°C).
- Prepare for baking on a greased sheet.
- Bake for 25-30 minutes.
- Cool before slicing.
- Serve and enjoy!
Notes
This bread pairs wonderfully with soups and can be stored at room temperature for up to 3 days.
Nutrition
- Serving Size: 1 serving
- Calories: 150
- Sugar: 1g
- Sodium: 200mg
- Fat: 1g
- Saturated Fat: 0g
- Unsaturated Fat: 0g
- Trans Fat: 0g
- Carbohydrates: 30g
- Fiber: 1g
- Protein: 4g
- Cholesterol: 0mg