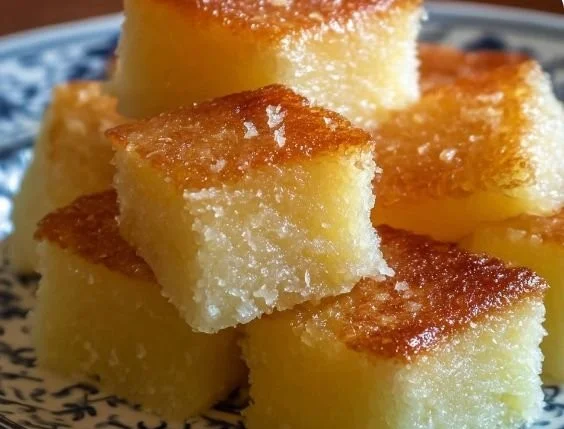
You know that feeling when you take a bite of something so delicious, it instantly transports you back to a cherished memory? For me, Hawaiian Butter Mochi is one of those treats; it reminds me of sun-soaked vacations in Hawaii, surrounded by palm trees and the sound of waves crashing. I remember indulging in this delightful dessert, its chewy texture and rich coconut flavor, making each bite feel like a hug from the island itself. Now, I want to share this magical recipe with you, so you can create your own little slice of paradise at home.
Recipe Timing
- Prep Duration: 15 minutes
- Active Cooking: 1 hour
- Total Duration: 1 hour 15 minutes
- Portion Size: 12 servings
- Complexity: Simple
Nutritional Recipe
- Calories per portion: 220
- Protein: 3g per serving
- Carbs: 34g per serving
- Fats: 9g per serving
- Fiber: 1g per serving
- Sugars: 16g per serving
- Sodium: 100mg per serving
Why You’ll Love This Hawaiian Butter Mochi
Hawaiian Butter Mochi is like a warm embrace in dessert form. With its unique combination of sweet rice flour and coconut milk, this dish brings a delightful chewiness that sets it apart from other desserts. Each bite offers a perfect balance of sweetness and creaminess, creating a comforting experience that melts in your mouth. Plus, it’s incredibly simple to make, which means you can share this island favorite with friends and family any time you want!
The Complete Cooking Journey
Join me as we embark on a delightful culinary journey to recreate this beloved Hawaiian delicacy. From mixing the dough to pulling it out of the oven, you will be whisked away to the beaches of Hawaii with each delicious step.
Ingredients:
- 2 cups sweet rice flour (mochi flour) (Essential for achieving the chewy texture.)
- 1 cup granulated sugar
- 1 tablespoon baking powder
- 1 can coconut milk (13.5 oz)
- ½ cup unsalted butter, melted (Can be substituted with non-dairy butter.)
- 4 large eggs
- 1 teaspoon vanilla extract
- 1 cup milk (Add gradually until desired consistency.)
Method:
Step 1: Gather Your Ingredients
Before we dive into mixing, set up your kitchen with all the needed ingredients. Make sure your sweet rice flour is ready to bring that chewy factor to your mochi!
Step 2: Preheat Your Oven
Set your oven to 350°F (175°C). It’s crucial for achieving the perfect bake, so let’s get it warming up while we prepare our batter.
Step 3: Combine Dry Ingredients
In a large mixing bowl, whisk together the sweet rice flour, granulated sugar, and baking powder. These dry ingredients will establish the foundation for our mochi.
Step 4: Mix Wet Ingredients
In another bowl, combine the coconut milk, melted butter, eggs, and vanilla extract. Whisk everything together until smooth and well blended, filling your kitchen with a deliciously sweet aroma.
Step 5: Combine Wet and Dry Mixtures
Gradually pour the wet mixture into the dry ingredients, stirring gently to combine. Be careful not to overmix; we want that lovely chewy texture to shine through!
Step 6: Adjust Consistency
Now, you’ll want to add in the milk, a little at a time, until you reach a smooth and slightly pourable consistency. This step is all about achieving the perfect balance!
Step 7: Pour into Baking Dish
Grease a 9×13 inch baking pan and pour the mochi batter inside, spreading it evenly. It’s like pouring a bit of sunshine right into your dish!
Step 8: Bake to Perfection
Place the dish in the preheated oven. Bake for 45-50 minutes, or until the top is lightly golden and a toothpick inserted in the center comes out clean.
Step 9: Cool and Set
Once your mochi is out of the oven, allow it to cool in the pan for about 15 minutes. Then, transfer it to a wire rack to cool completely, filling your kitchen with the sweetest scent of coconut and vanilla.
Step 10: Cut and Serve
Once cooled, cut the mochi into squares or rectangles, and it’s ready to be devoured. Serve it as is or dust it with a little cornstarch to keep it from sticking together.
Serving Suggestions & Pairings
Hawaiian Butter Mochi is delightful on its own, but why not elevate it a bit? Pair it with a fresh tropical fruit salad, a scoop of coconut ice cream, or even a drizzle of chocolate sauce for a decadent twist. It makes a fantastic dessert or afternoon snack, perfect for sharing during sunsets or gatherings.
Storage & Leftovers Guide
Store any leftovers in an airtight container at room temperature for up to 3 days. If you’d like to keep it longer, refrigerate it for up to a week, although trust me, it probably won’t last that long in your home!
Kitchen Wisdom & Success Tips
- For an extra touch of flavor, consider adding in shredded coconut or a sprinkle of salt to the batter.
- If using non-dairy butter, look for a brand that closely mimics the richness of regular butter to keep that flavor profile intact.
- Don’t hesitate to check your mochi a few minutes early; ovens can vary in heating efficiency.
Flavor Variations & Adaptations
Feel free to get creative! How about adding a bit of matcha powder for a subtle green tea flavor? Or you could incorporate some crushed pineapple for a tropical twist that’ll make you feel like you’re lounging on a Hawaiian beach.
Reader Questions & Solutions
-
Can I use regular rice flour instead of sweet rice flour?
- No, sweet rice flour is essential for achieving the mochi’s signature chewy texture. Stick with the sweet rice flour for the best results!
-
How do I know when my batter is mixed enough?
- Just mix until you don’t see dry flour in the batter. Avoid overmixing to maintain chewiness.
-
What’s the best way to store leftover mochi?
- Keep it in an airtight container at room temperature or in the refrigerator for up to a week. If it gets too firm in the fridge, a quick microwave for a few seconds will help soften it!
-
Is it possible to make this recipe vegan?
- Absolutely! Simply substitute the eggs with flax eggs (1 tablespoon of ground flaxseed mixed with 3 tablespoons of water = 1 egg), and use non-dairy butter.
-
Can I freeze mochi?
- Yes! Cut it into squares and wrap them individually in plastic wrap before putting them in a freezer bag. They can last for up to 3 months in the freezer.
Wrapping Up
There’s something incredibly special about making Hawaiian Butter Mochi at home. It’s more than just a dessert; it’s a memory, a celebration, and a delight that brings the warmth of the islands right to your table. So roll up your sleeves, gather those ingredients, and dive into this delectable journey! Your taste buds will thank you, and who knows, this recipe might just become a beloved favorite in your home as it has in mine! Enjoy every bite!
PrintHawaiian Butter Mochi
A delightful dessert with a chewy texture and rich coconut flavor, reminiscent of sun-soaked vacations in Hawaii.
- Prep Time: 15 minutes
- Cook Time: 60 minutes
- Total Time: 75 minutes
- Yield: 12 servings 1x
- Category: Dessert
- Method: Baking
- Cuisine: Hawaiian
- Diet: Vegetarian
Ingredients
- 2 cups sweet rice flour (mochi flour)
- 1 cup granulated sugar
- 1 tablespoon baking powder
- 1 can coconut milk (13.5 oz)
- ½ cup unsalted butter, melted
- 4 large eggs
- 1 teaspoon vanilla extract
- 1 cup milk (add gradually until desired consistency)
Instructions
- Gather Your Ingredients
- Preheat Your Oven
- Combine Dry Ingredients
- Mix Wet Ingredients
- Combine Wet and Dry Mixtures
- Adjust Consistency
- Pour into Baking Dish
- Bake to Perfection
- Cool and Set
- Cut and Serve
Notes
For extra flavor, consider adding shredded coconut or a sprinkle of salt. To make it vegan, substitute eggs with flax eggs and use non-dairy butter.
Nutrition
- Serving Size: 1 serving
- Calories: 220
- Sugar: 16g
- Sodium: 100mg
- Fat: 9g
- Saturated Fat: 5g
- Unsaturated Fat: 4g
- Trans Fat: 0g
- Carbohydrates: 34g
- Fiber: 1g
- Protein: 3g
- Cholesterol: 80mg