It was a cool autumn evening, and the scent of roasted vegetables wafted through my kitchen, evoking memories of family dinners past. My grandmother had a knack for turning simple ingredients into something magical, often using colorful bell peppers as her canvas. She taught me that food isn’t just about sustenance; it’s about the stories we share, the love we put into our cooking, and the joy of bringing people together around the table. Today, I want to share with you a recipe that embodies that spirit—a high-protein easy stuffed bell peppers dish that’s hearty, healthy, and oh so satisfying!
Recipe Timing
- Prep Duration: 15 minutes
- Active Cooking: 20-25 minutes
- Total Duration: 40-45 minutes
- Portion Size: Serves 4
- Complexity: Simple
Nutritional Recipe
- Calories per portion: Approx. 350
- Protein: 28 grams
- Carbs: 30 grams
- Fats: 15 grams
- Fiber: 5 grams
- Sugars: 5 grams
- Sodium: 450 mg
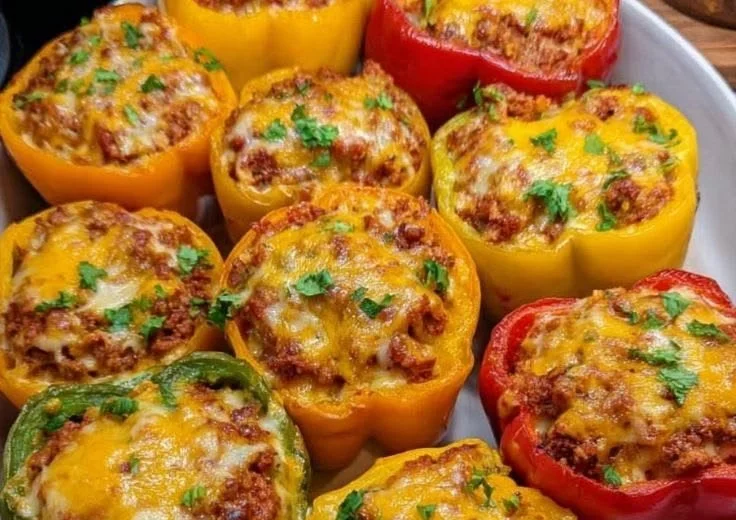
Why You’ll Love This High-Protein Easy Stuffed Bell Peppers – Hearty & Healthy Dinner Delight
These stuffed bell peppers are a warm hug on a plate. Packed with flavorful lean ground beef, wholesome brown rice, and vibrant vegetables, they offer a satisfying meal that’s both healthy and easy to whip up. Not to mention, they’re colorful and inviting, making them perfect for family dinners or when you want to impress guests without breaking a sweat in the kitchen. They’re not only filling but also rich in protein to keep you energized and satisfied!
The Complete Cooking Journey
Let’s embark on this culinary adventure together! From prepping those luscious bell peppers to creating a savory filling, and to finally basking in the aroma of your finished dish, this journey is filled with delightful steps that will make your taste buds dance.
Ingredients:
- 4 large bell peppers, hollowed and stems removed
- 1 lb lean ground beef
- 1/2 cup uncooked brown rice
- 1 tablespoon extra-virgin olive oil
- 1 cup chopped onion
- 2 cloves garlic, minced
- 1/4 cup tomato paste
- 1 (14.5 oz) can diced tomatoes (juices included)
- 1 teaspoon dried oregano
- 1 teaspoon paprika
- Salt and pepper to taste
- 1/4 cup chopped fresh parsley
Method:
Step 1: Preheat Your Oven
Preheat your oven to 375°F (190°C) so that it’s hot and ready for our delicious peppers.
Step 2: Prepare the Peppers
Place the hollowed bell peppers in a large oven-safe baking dish. To prevent burning, peel and brush the outer skins with a little water.
Step 3: Sauté the Meat
In a large skillet, heat the olive oil over medium heat. Add the ground beef and brown it thoroughly, releasing those mouthwatering flavors.
Step 4: Add Aromatics
Stir in the chopped onion, minced garlic, dried oregano, and paprika. Cook until the onions soften, about 3-4 minutes, breathing in those beautiful aromas as they meld.
Step 5: Combine the Filling
Now, stir in the uncooked brown rice, tomato paste, and diced tomatoes with their juices. Season generously with salt and pepper, letting it simmer for about 5 minutes. The rice should start to firm up, prepping itself to soak in all the flavors.
Step 6: Pack the Peppers
Spoon the hearty mixture into each bell pepper, pressing down gently to pack it in tightly. Make sure it’s filled to the brim, as we want every last bit of that savory goodness.
Step 7: Create Moisture
Pour 1/2 cup of water into the baking dish around the peppers to maintain moistness during baking.
Step 8: Bake to Perfection
Place the baking dish in the oven and bake for 25-30 minutes until the peppers are tender and the filling is bubbly and delicious.
Serving Suggestions & Pairings
Serve these delightful stuffed peppers with a fresh garden salad or a side of crusty whole-grain bread for a complete meal. A dollop of Greek yogurt or a sprinkle of feta cheese on top can elevate this dish even further, offering a tangy contrast to the flavors within.
Storage & Leftovers Guide
Leftover stuffed peppers can be stored in an airtight container in the fridge for up to 3 days. They also freeze well for up to 3 months; just make sure to thaw them overnight in the refrigerator before reheating.
Kitchen Wisdom & Success Tips
- Choosing Peppers: Opt for firm, brightly colored peppers, which will hold their shape while baking.
- Making it Vegetarian: Substitute ground beef with black beans or lentils for a vegetarian spin.
- Bulk Cooking: You can double the recipe and have meals ready for the week—just increase the baking time slightly if they’re crowded in the dish.
Flavor Variations & Adaptations
Feel free to experiment by adding your favorite spices or veggies! Corn, spinach, or even some cheese can be delightful additions to the filling, making it your own unique creation.
Reader Questions & Solutions
-
Can I use quinoa instead of brown rice?
Absolutely! Quinoa is a great alternative and cooks faster, providing a light, fluffy texture. Just adjust the cooking time accordingly. -
What if my peppers are too small?
No problem! Use mini bell peppers as bite-sized appetizers or substitute with larger tomatoes if you prefer. -
How can I increase the spice level?
Add some crushed red pepper flakes or fresh jalapeños to the filling for a kick! -
Can I prepare these in advance?
Yes, you can prepare the filling ahead of time and stuff the peppers just before baking. They keep well in the fridge for up to a day. -
Is it safe to freeze these?
Definitely! Make sure they are cooled completely before freezing, and they can be reheated straight from frozen.
Wrapping Up
Cooking isn’t just about getting dinner on the table; it’s an experience filled with creativity, love, and connection. These high-protein stuffed bell peppers are not only a nutritious choice but also a delicious way to gather those you cherish. So roll up your sleeves, get those peppers all dressed up, and create a delightful meal that your family will rave about! Happy cooking!
PrintHigh-Protein Easy Stuffed Bell Peppers

Hearty stuffed bell peppers filled with ground beef, brown rice, and vibrant vegetables, perfect for family dinners.
- Prep Time: 15 minutes
- Cook Time: 30 minutes
- Total Time: 45 minutes
- Yield: 4 servings 1x
- Category: Main Course
- Method: Baking
- Cuisine: American
- Diet: High Protein
Ingredients
- 4 large bell peppers, hollowed and stems removed
- 1 lb lean ground beef
- 1/2 cup uncooked brown rice
- 1 tablespoon extra-virgin olive oil
- 1 cup chopped onion
- 2 cloves garlic, minced
- 1/4 cup tomato paste
- 1 (14.5 oz) can diced tomatoes (juices included)
- 1 teaspoon dried oregano
- 1 teaspoon paprika
- Salt and pepper to taste
- 1/4 cup chopped fresh parsley
Instructions
- Preheat your oven to 375°F (190°C).
- Place the hollowed bell peppers in a large oven-safe baking dish.
- Heat the olive oil in a large skillet over medium heat. Add the ground beef and brown it thoroughly.
- Stir in the chopped onion, minced garlic, dried oregano, and paprika. Cook until the onions soften, about 3-4 minutes.
- Combine the uncooked brown rice, tomato paste, and diced tomatoes with their juices. Season with salt and pepper, and let it simmer for about 5 minutes.
- Spoon the mixture into each bell pepper, pressing down gently to fill it tightly.
- Pour 1/2 cup of water into the baking dish around the peppers.
- Place the baking dish in the oven and bake for 25-30 minutes until the peppers are tender and the filling is bubbly.
Notes
Serve with a fresh garden salad or crusty whole-grain bread. Store leftovers in an airtight container for up to 3 days, or freeze for up to 3 months.
Nutrition
- Serving Size: 1 stuffed pepper
- Calories: 350
- Sugar: 5g
- Sodium: 450mg
- Fat: 15g
- Saturated Fat: 5g
- Unsaturated Fat: 8g
- Trans Fat: 0g
- Carbohydrates: 30g
- Fiber: 5g
- Protein: 28g
- Cholesterol: 70mg